Tag Archive for: GOFest
Being adventure smart in the springtime backcountry
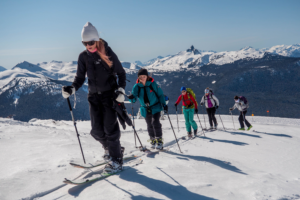
The recent sunny weather has been gorgeous for heading into the backcountry on skis, a snowboard or sled for springtime lines, outstanding views, and end-of-day hangouts catching the final rays with your friends. But, as we all know, the backcountry needs to be treated with respect. We caught up with Joelle Tiessen, Marketing Director of Mountain Skills Academy & Adventures (MSAA), for guidance on how to safely make the most of springtime in the backcountry.
Dress in layers:it get warm hiking in the Spring. Photo credit: MSAA
What steps do you recommend beginners take before heading into the backcountry to ski, snowboard or sled?
Tiessen: Before anyone heads into the backcountry, the first step is always to take a Level 1 Avalanche Skills Training (AST 1) course. This course makes you aware of the dangers of travelling in uncontrolled terrain and beyond the ski patrol resort boundaries. [In resorts patrollers manage the terrain and are also available for rescue. “Uncontrolled terrain” isn’t managed to reduce the risk of avalanche or other hazards such as crevasses, and rescue may not be possible—Editor.] If you are planning to go into the backcountry you want to always carry a transceiver, probe and shovel. The AST 1 course teaches you how to use these tools in an avalanche rescue situation and how to stay out of avalanche trouble spots so hopefully you never need to use those skills.
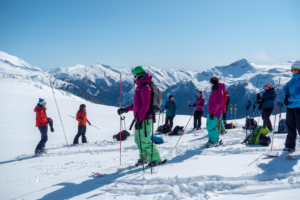
Learn about safety in the backcountry on an introductory Level 1 Avalanche Skills Training course. Photo credit: MSAA
What would you recommend somebody brings in their bag on a backcountry trip? AdventureSmart recommends these 10 items (a flashlight, fire-making kit, signaling device, extra food and water, extra clothing, navigation/communication aids, first aid kid, emergency shelter, pocket knife and sun protection), but do you have any further tips?
Tiessen: One item that we would add to this list is a repair kit for your gear. You don’t want to have a binding or pole or other key item break while you are way out in the backcountry. If something does break, having spare parts, duct tape, ski straps and a multi-tool can come in very handy and make the difference between getting back before dark or spending a long night out.
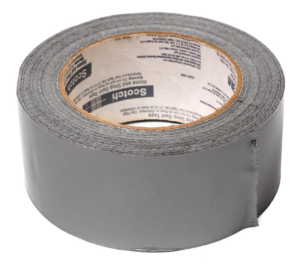
Duct Tape can get you out of a sticky situation.
Is avalanche.ca the best website to check on conditions? Or do you know of other resources?
Tiessen: For the Sea to Sky area, avalanche.ca is the best resource for avalanche conditions. It’s also good to get in habit of browsing a Facebook group like South Coast Touring to read about individual experiences in specific locations. Another source for a little geeking out is the Wayne Flann Avalanche Blog. There are many more, but find your favourites and keep current on local conditions throughout the season.
The backcountry is a pretty intimidating place, do you recommend any ways for newer adventurers to get ongoing guidance and mentorship?
Tiessen: There are several local groups who meet up casually (like South Coast Touring on Facebook) and welcome new tourers (who have taken AST1), there are also mentor groups like Mountain Mentors for women. Hiring a local ski guide for a day is a great way to get into new terrain and learn tips to make your touring experiences better and safer. Many local shops also offer clinics for free or a minimal fee on certain dates throughout the season. And if you like to geek out a little, our local bookstore [Armchair Books. You can also try Whistler Public Library.] has titles on avalanche topics and there is also YouTube for mini instructional videos to keep your skills fresh. If you are very new and not sure you’re ready to commit to all the gear and training, just take an Intro to Backcountry guided tour where you can get a taste and see if touring is for you.
What should experienced backcountry adventurers do to keep their skills fresh? I’ve heard it’s important to take an annual avalanche safety refresher course.
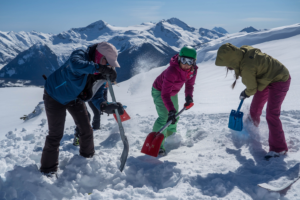
Tiessen: It is good to practice your avalanche training skills regularly, especially at the beginning of each season. You can do this with your touring friends or take a one-day refresher course with a professional guide to continue learning. There are also options to build more advanced rescue skills by taking a Companion Rescue Skills clinic or going even farther and taking the Level 2 Avalanche Skills Training course. There is a snow field up on Blackcomb Mountain near the Rendezvous where patrollers bury transceivers to practice searching, and members of the public are welcome to practice there as well.
If someone is vacationing in Whistler, is there a way for them to safely experience this area’s backcountry without owning all the equipment?
Tiessen: The best and safest way for visitors to get into the backcountry is to go with a local guide who can show them around terrain appropriate to their skill level. There are a couple of local businesses that specialize in renting all the touring gear you need from skis, skins, splitboards, transceivers, probes and shovels and even avalanche airbags. MSAA’s tours do not include rental gear but we partner up with Escape Route Alpine Demo Centre and they offer our guests a 20 per cent discount on most rental gear. [Excess Backcountry is another option—Editor.]
Read more about being adventure smart in the backcountry here and Mountain Skills Academy & Adventures. For more adventures, join us at GO Fest from May 17 to 20.
The Wonder of Whistler’s Night Skies
The Wonder of Whistler’s Night Skies: What you need to know to capture them for yourself
Whistler’s known for its incredible views, bolstered by bluebird days and stunning peaks. But once the sun goes down there’s nothing like the quiet of a myriad of twinkling stars peeking through treetops or the shimmering beauty of the Aurora Borealis as it dances in the sky. Throw in a backdrop like the Black Tusk, a glacier, or an ancient Douglas Fir and you may never want to see daylight again.
Before you strap on a pack and head out for the night with your camera, here’s what you need to know:
- Check the weather and moon phases. The last thing you want is to be on top of a mountain in a lightning storm or taking pictures of the Milky Way during a full moon. You’ll want a clear sky with no cloud cover if you’re taking pictures of the stars.
- Dress for the cold. It gets cold, very cold in the alpine. Bring warm gloves, a headlamp, and a toque plus an extra layer. A warm thermos of tea or hot chocolate will keep your insides warm while you sit and wait for the ideal picture.
- Bring food. You’ll probably be hiking or bushwacking to get that perfect shot. All that work will build up an appetite, especially since you’ll be carrying all that gear.
- Speaking of gear, make sure you have it all. You’ll want a tripod to get that crisp image since there is less light and your hands won’t stay still enough for your slow shutter speeds. Bring all your lenses, many empty memory cards, and a shutter release cable so you aren’t touching the camera and making it jiggle.
- Scout your area during the day. This is a great time saver since you can look for ways around objects like trees, houses, mountains, boulders or chairlifts – or the best angle to include them.
- Download a star app. This will help you know which stars or planets you’re looking at, and help you find the ones you want.
- Don’t forget to tell others where you’re going. Even if you’re walking up the hill at the back of your house, let someone know where you are and when you’ll return. The smallest rock or root can be invisible at night and leave you susceptible to tripping – especially if you’re looking up. Plus it’s easy to get lost in the dark. See tip #5 to avoid this.
- Memorize where infinity is on each of your lenses. Focusing is one of the greatest frustrations in night photography. While each lens has an infinity mark, it may not be accurate. Take the time to memorize where it is on each of your lenses and you’ll be significantly less frustrated in the dark when it’s cold out.
- Be prepared to wait. Night photography is all about slow shutter speeds and long exposures. Don’t expect to snap a shot in five minutes. Commit to the night and you’ll be rewarded with the vibrant, dramatic shot that your imagination envisioned.
Cover image: Mike Crane


Whistler's Great Outdoors Festival is produced by the Resort Municipality of Whistler and is funded by the Province of British Columbia.